Special Natural Fibre Trailing-Tail
for Kites.
The manufacturing of a Special Rope Trailing Line
from Natural Fibres.
Keywords: Kite, natural fibers, hemp, cotton, maize straw, rice straw,
raffia, rush, cordage, ropemaking, tail-line, trailing line, cerf-volant,
queue traînante, fibres naturelles, corderie
(see German Version)
Making ropes in
the "good old times"...
The traditionally close connections between ropemaking and kite craft...
Below, see a typical ensemble of that profession, presumably in the middle
of 18th century
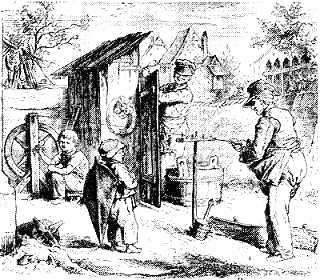 The picture is showing a boy with his shouldered
pear-tip"-kite (French origin) and his kite-line wound around a
stick under his right arm. Hard working children were a normal fact in
those times. So a child is sitting in the background turning round the
ropemaker's wheel the whole day long, for the worker could spin a
thread from the stock of hemp he's holding in front in his apron. Obviously
none of the pictured persons is possessing shoes! The thread lies
on a "ropemaker's-rake" for it doesn't get dirty by hanging on the
ground, an important thing considering long rope lengths! Also visible a
little wooden vessel with a liquid for smoothening the rope's surface and
a big wooden vessel with water. On the left side in the foreground is lying
(a little bit untypical on the floor...) a reel with a ready made rope.
The picture is showing a boy with his shouldered
pear-tip"-kite (French origin) and his kite-line wound around a
stick under his right arm. Hard working children were a normal fact in
those times. So a child is sitting in the background turning round the
ropemaker's wheel the whole day long, for the worker could spin a
thread from the stock of hemp he's holding in front in his apron. Obviously
none of the pictured persons is possessing shoes! The thread lies
on a "ropemaker's-rake" for it doesn't get dirty by hanging on the
ground, an important thing considering long rope lengths! Also visible a
little wooden vessel with a liquid for smoothening the rope's surface and
a big wooden vessel with water. On the left side in the foreground is lying
(a little bit untypical on the floor...) a reel with a ready made rope.
Since
dark prehistoric times, the manufacturing and use of ropes made of natural
fibres is a well known craft. In fact, it's one of the oldest technologies
of man as shown by stone age drawings on the wall of Spanish caverns in the
Pyrenees mountains. Those pictures situated at the frontier between France
and Spain can be dated back at least 20.000 years in the last ice-age
showing climbing men using a rope. A lot of pictures of the use of ropes
furnishes the egyptian culture especially concerning the building of the
famous pyramids.
In Polynesia even today techniques are used, which seem to be the same, our
ancestors were familiar with in stone age, using as a tool nothing but the
own body.
Here's an excerpt of P.H.Buck, "The
Material Culture of the Cook Islands":
(...) Two-ply Twisted Cords, aho.
Strips of bast of the requisite thickness were rolled as two separate cords
on the bare thigh, and then with a back movement rolled together over each
other. (...) The ends of fresh strips of material were merely overlapped
over the shortening end of another, and the rolling joined them. Very long
lines were made for seine nets. (...)
Please see the two films by G.Koch at the IWF
"Herstellung einer Kokosfaserschnur"
(silent film sof 1968 showing how a coconut-fibre line is made in Mikronesia
showing the "bare-tigh-technique") and also the Book of the American Bishop
Museum on Hawaiian Cordage and last
but not least Himmelfarb's
book considering all aspects of modern ropemaking
Daily, we are still using the "little brother" of the
rope, the string, for closing our shoes --- and last but not least for
kiteflying.
Natural fibre materials used until now are for example Hemp,
Flax, Coco, Cotton, Sisal,
Pinapple, Manila (a special non fuiting
sort of banana tree), different straw sorts
like maize- and
rice, or different raffia sorts from palms
mainly used in Asia.
All natural materials have one great
disadvantage: When they become wet, rot and mildew begin their destructive
work slowly weakening the rope's structure.
Therefore, in the beginning of 20 century, synthetic fibres were developed.
They have a much better performance; but most of them have the
disadvantage---that they persist for at least some decades without rotting.
So they are a source of environmental pollution...
The main principles of manufacturing as well as the tools didn't change very
much until the last two centuries, when engines began to substitute the work
of man.
But the old techniques (see a text on old Hawaiian
cordage techniques) are still used in countries, where plenty of
manpower is available and engines are too expensive.
When making a simple thread of single fibres, the secret of the fibre's cohesion
is their twist. Although a thread made by straight fibres would be of much
greater strength, twisting is the only way for connecting relatively short
fibres to a long rope. By the way, the ready rope becomes ca. 30% weaker
by twisting than the single fibre's sum of strength and its strength is
diminished once more (ca.70%!!) if it becomes wet ...
We distinguish two different
twists:
Right or "Z" twist
in counterclockwise direction,
Left or "S"-twist
in clockwise direction.
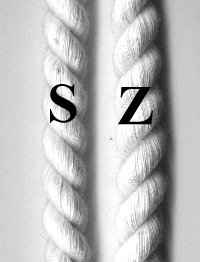
Twisted rope with "right" or "Z"-twist
Please note: the twists of thread, line and the final rope
are always in opposite sense to the next bigger following
structure.
In the following
chapter I want to present you the special kite-tail system used by the Chinese
Whistle-Kites of Nantong. The double trailing-lines stabilizing system is
essential for that type of kite, because its a flat kite without any self
stabilizing system like for example a dihedral or so.
In flight, those double trailing lines, which are fixed to a "tail-bridle"
(obligate!), are characterized by a feature: The lines don't hang parallel
to another behind the kite, they even "refuse" parallelity and hang in a
upside down "V"-shape in an angle of 10-15°, stabilizing the
flight either very effective and decorative .
That strange behaviour causes a curious look on these rebellious
tail-lines.
The first look shows nothing particular:
-
Two Trailing lines,
-
consisting of two strands,
-
Material: Natural fibres, normally rice-straw.
-
Diameter of approx. 8mm becoming thinner towards the ends
-
Length ca.10-15 times the kite's length.
Apparently simple, normal "Low-Tech" Lines, aren't they...?
When having a closer look, the little mystery is solved and I admire again
the asian's "kite-engineer's" talent of observation and construction.
The following properties are the explication for the curious "drift apart",
which seems to outwit the laws of physics.
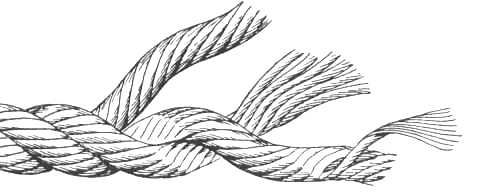
-
One line has a so-called "Zs"-twist, the other a
"Sz"-twist
-
The lines are made with two strands having therefore strong jutting
out "ribs"
-
The lines hang behind the kite in a manner, that the "line-ribs" converge/
run together in sense of the streaming wind.
These three properties explain the behaviour of the two lines.
When making ropes for other, normal purposes, the ropemaker pays special
attention for making a smooth surface in order to minimize friction/ destruction
forces on the rope. Therefore the rope is made normally from 3 (-4) strands
and the rope is finally smoothened by special mechanical devices and watery
fluids.
By making the rope with only two strands, the surface becomes extremely "ribbed"
and the air streaming by finds aerodynamic effective structures
resulting as a force which lets drifting the ropes sidewards. The opposite
twist causes the ropes drifting apart from another or to another, depending
the way round they hang.
The following chapter is written for those, who now want to try simple techniques
which were faithful compagnons of man for thousands of years since at least
the last ice-age...
First of all a few important terms:
The Fibre - is the basic structure
of the thread. A fibre is in the following the maize straw/ raffia, hemp
etc.
The Thread - is twisted from
fibres. Without a twist, the fibres wouldn't connect and fall apart.
The Line - consists of (again) threads
twisted around another.
When
making a rope for a single-line tail, only few things are required:
The required Time:
The Material:
-
Rushes, which grow on marshy areas on meadows in the forest
or near lakes. That material I consider to be the
best one. It has a good length of 30-60cm, is strong and has
a beautiful color with a smooth surface.
-
Maize straw (NOT the leaves of the plant but the tender leaves around the
corn-cub!), or raffia.
For a 10m line you will need approx. 80g of maize straw.
-
Water with a dash of dishwashing liquid in a bucked to soak the maize-
or. raffia-straw before its use.
The Tools:
-
One strong iron hook (No.1), to give a hold when we twist the thread/ strand.
-
One strong hook with swivel (No.2), for letting the rope turn around when
twisting together the two ready strands/ threads.
-
Your own hands
-
One helping person's hands
-
A long space, which should be 20% longer than the ready line.
That's all you need for the old, simple technique of rope making.
By the Way:
If you replace the hook No.1 (non rotatable) by a drilling engine (running
right and left) with a hook instead of a driller, the work will go on very
fast although a little unsporting... ;-)) . Don't forget, to connect the
drilling engine to a long cable with a switch corresponding to your desired
line-length. Here's the view of an old simple ropemaking engine, the
"Iron Wheel"
from 1850, in this article replaced by the drilling engine mentioned above.
The Twisting of the Thread and the ready
Line
(showed at the example of maize-straw; the "original material" for the
Chinese Nantong Flute Kites being rice-straw)
NOTE:
Please read the instruction first; i.e. before you begin
working!!!
-
Fix the hook No.1 (or some iron thread) in the wall or on your radiator at
the front-side of your house corridor. The hook mustn't be rotatable.
-
Soak the rushes/ maize-straw (ca. 160g) for about one hour in water with
a dash of dishwashing liquid.
-
Lay 6 rushes or three maize-straw leaves (=MSL) together and twist them clockwise
it to a short thread of a few inches length and a diameter of 3-4mm. Bind
that thread with a simple knot at the hook.
-
After having fixed the beginning of the thread, continue twisting clockwise
the rest of the three MSL until a rest of untwisted leaves of about 8cm.
Now another MSL is put between the 8cm-ends and is twisted in also for 3cm,
then another MSL is added in the same manner and so on. So at least 3 MSL's
are always twisted together to guarantee the 3-4mm thickness (strength) of
the thread. Please twist quite hard.
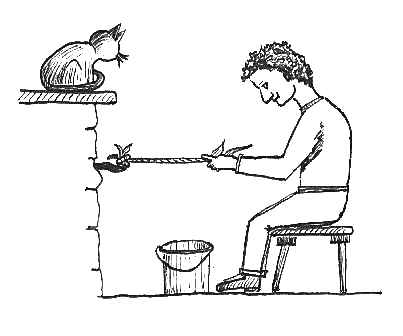
The
drawing
shows the working position with the non rotatable holding-hook in the wall,
which prevents the thread losing its twist. In the bucket the soaked straw.
-
After some practice you will be able, to "hide" the ends of the "old" and
"new" MSL's in a manner, that they will lay in the middle of the thread and
don't stand out of the line. So, a relative smoothness of the thread is
achieved.
Please
note: With the
finer raffia, the works could be done better/ easier because of its
greater length (about one meter) and better evenness. The length of
maize-straw is max. 30cm, so the results are more "rustic" than those of
raffia.
-
When a thread is ready (length at least 13m for
a final length of 10m; twisting causes a shortening), fix the ends in order
to prevent an undesired self-untwisting/ unravelling of the thread!
-
For ONE trailing tail-line you need in each case TWO of such twisted
threads with the SAME TWISTING-DIRECTION!
-
Consequently, when you, made one thread clockwise (=twisted LEFT or "S"-twist),
you will need exactly the same thread once more to make one of the two different
trailing lines.
-
When you have finished two equal (=direction) twisted threads (minimum length
13m for a kite of 1m hight), the two threads are bound together at their
beginning and fixed with a knot to hook No.2 (=rotatable).
Please keep the thread's ends fixed and the
thread itself tight to prevent kinking and self-untwisting/ unravelling!!
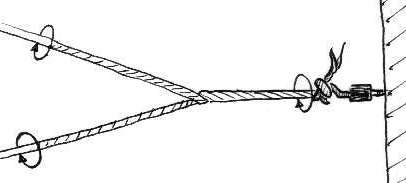
Then the two threads are carefully laid together (the laying of a
"S"-twisted thread to a "Z"-twisted line will happen "automatically"!), the
drawing
is showing the example of two "S"-twisted threads, which are laid together
to a "Z"-twist line (rotatable hook No.2 is in the wall). By the twist-caused
pre-tension in the threads they are laying together almost alone. The threads
will loosen a part of their twist and must repeatedly be "backtwisted"
i.e.twisted once more after every laying of 50cm.
-
After finishing laying and the two strand line being ready, make a piece
of cellulose tape around each end of the two-strand-line to prevent
unravelling.
Now one half of the trailing line system is
ready.
Then repeat the whole procedure from the beginning (Point1-10) with
a TWIST COUNTERCLOCKWISE (=TWISTED RIGHT or "Z"-Twist.) for the second
half of the trailing line system!
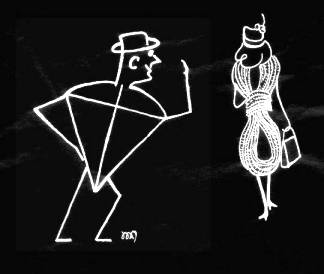
BOTH trailing lines being ready now will be hanged into the tail-bridle of
the kite, because the lines must NOT be distorted.
They only can function (i.e. drift apart in an angle of 15°)
if they hang down from the kite in a special manner! If you hold the kite
with the face to the wind in front of you and the rear end downwards, the
"ribs" of the two lines must come together in wind-direction, i.e.must come
together in downward direction. See accompanying
"SZ"-picture!
Above is the kite, beneath the rear end of the trailing lines.
Only you...!
A good flight to you all!
By the way, when you ever come along the French Dieppe- or Berck-sur-mer
kite-festival,
don't miss to see:
situated in the North of Rouen, at the N27
in Notre-Dame de Bondeville
the famous
Mechanical Ropemaking
Factory
"Corderie Vallois", which was in work from 1820 to
1978.
After finishing its production in 1978, the factory became
an industrial museum. The factory is set in motion by a big water-wheel and
produces all rope types from ordinary shoelaces
up to ship tows.
The technique is simple, martially and LOUD...,
there are guided visits with good explanations
(IR headset technique) in different languages. The working machines can be
watched in a distance of only a few meters. For every kiter (and other...)
sportsman, who wants to know the origin of his lines the visit is an absolute
MUST!
Here's the address:
Musée Industriel de la Corderie
Vallois
185, route de Dieppe
76960 Notre-Dame de Bondeville
Phone: +33 2 35 74 35 35, Fax:+33 2 35 74 58 45
Opened daily from 13.30h to 18.00h. (no internet site available yet)
(Cette ancienne filature hydraulique datant de 1820 a été
transformée en corderie mécanique à la fin du
XIXe siècle. Elle a fonctionné jusqu’en 1978. Les cableuses,
retordeuses, pelotonneuses, tresseuses
installées sur deux étages visitables sont en fonctionnement.
Une roue hydraulique actionne le système
d’entraînement. Durant les visites, les machines sont actionnées
par des techniciens qui répondent aux questions des visiteurs. Exposition
:"Une vallée, des usines et des hommes", portant sur le patrimoine
industriel de la vallée du Cailly.
Visite-guidée. Conférencières sont présentes
pour répondre aux questions.)
Some other links to ropemaking sites:
http://www.repslagarbanan.se/de/index.html
(Ropemaking factory in Älvängen, SWEDEN)
http://www.hempology.org/index.html (hempology.org)
http://www.ropecord.com/cordage/links/default2.html
(the Cordage Institute)
DO you have any questions ?, ideas, criticism
or new LINKS concerning the theme?
Then please, give me the opportunity to continue improving these pages
for YOU and
write
me your opinion, Thank
YOU!
Uli Wahl, All Rights Reserved
Back to Kite Musical Instruments/ Aeolian Instruments
index page